Of the few
beading methods I know, my personal opinion is that loom beading is the
easiest method of beading. Gather all your supplies into one area so you
will have them at hand as you need them, including your graphed bead design.
If this is your first time, start with a small project, maybe five rows
and 15 columns.
![]()
THREAD THE LOOM
Count
the rows of beads you have colored on your graph paper from top to bottom
in the first column. Add 1 to that number. This new number is the number
of rows of thread you will string onto the loom. Pull some thread from
the spool and loop it around the nail on the left side of the loom and
tie a knot around it. Pull the thread tight across the loom and bring the
thread around the nail on the right side of the loom. Bring the thread
back across to the left side of the loom and bring it aroun the left nail
again. Remember to keep the thread pulled tight. This time when you bring
the thread back across the loom, make sure it makes a third row and doesn't
cross between the first and second rows. Repeat this until you reach the
last row needed. Be sure not to cross or tangle any threads or rows and
to keep the thread pulled tight. At the end of the last row after wrapping
around the nail, pull some extra tread from the spool then cut it. Loop
this excess thread around the nail and tie a knot in it. The loom is now
threaded.
![]()
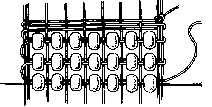
APPLYING THE BEADS
Cut
about two feet of thread from the spool. Take one end of the thread and
loop it around the top row of thread on the loom and tie a knot around
it. Scoot the knot to the far left end of the loom. Take the other end
of the thread and thread the needle with it and tie a knot at the eye.
Bring the needle underneath all the rows of threads on the loom.
Looking at your graphed
bead design, start from the top and left at the first row of beads on the
first column. Put this first bead onto the needle. The second bead is beneath
the first bead in column one, place it on the needle next. Read the graph
from top to bottom and place all of the beads in column one onto the needle
according to the number and colors specified on your graphed design. After
you have the first column on the thread, pull the thread tight and push
the entire column of beads up underneath the rows of threads on the loom.
From underneath, push the first bead up so it rests between row one and
two of the threads on the loom. Push the second bead up so it rests between
row two and three of the threads on the loom. Repeat this with the other
beads until you have each bead in the column resting between the appropriate
threds on the loom. Next take the needle and push it through the beads
starting from the bottom of the column. Make sure the needle goes over
the threads on the loom. Otherwise the beads will sag beneath the threads
because they won't be attached. Continue to pull the thread through the
first column until there is no more slack, pull tight. Again bring the
needle underneath the threads on the loom. Now string the second column
of beads according to your graphed design. Repeat the procedure given for
attaching the first column of beads. Attach the second column in the same
way. If needed push the second column over against the first column with
your fingers so they touch each other. Continue this same procedure for
the proceeding columns. If you run out of thread, unthread the needle and
tie the thread to the top or bottom row of the threads on the loom. Tie
a knot in it. Cut another length of thread and tie one end of it to the
top row of thread on the loom. Use the other end to thread the needle and
tie a knot at the eye then continue on.
![]()
FINISHING TOUCHES
When you have finished
beading the last column of your project, take a strip of masking tape and
place it over the top and underneath the threads on the loom leaving a
small space between the tape and each end of the beaded piece. Tape each
end. Next cut each end of the threads on the outsides of where the tape
is.
Take each end and
half the threads and tie each half of the threads together in a knot. Do
this on both ends. Cut the excess length of thread off and tape the knots.
You may take this
piece of beadwork and depending on what it is ... sew it to clothing, leather
or other materials, attach clasps on each end for bracelets or necklaces,
it's up to you how to finish it!
![]()
![]() more methods
to come!
more methods
to come!