
!!!CAUTION!!! Do NOT use VS Code's Remote SSH to connect to schooner!!!

Doing this will create a VS Code Server task on the login nodes, which can consume a large amount of RAM on the login nodes quickly. This could potentially CRASH the login nodes, thus preventing all 1000+ OSCER users from logging in!!!
If you have trouble following the instruction below, feel free to join OSCER zoom help sessions every Thursday from 1PM-3PM,
Logging in to OSCER Computers via Secure Shell
Please note that, for security reasons, you can log into OSCER resources via Secure Shell only.
Table Of Contents
Windows
(A) MobaXterm
1. Downloading and Installing MobaXterm
- Go to https://mobaxterm.mobatek.net/download-home-edition.html to download MobaXterm Home Edition. We recommend the portable edition, since it does not require any installation. You simply need to download the compressed package and extract it.

2. Running MobaXterm
- Simply double click on the MobaXterm executable file after you extract the downloaded zip package. As of this writing, the latest version of MobaXterm personal is 23.2, hence the executable file name is
MobaXterm_Personal_23.2.exe.

- The first time you run MobaXterm, a Windows Firewall might pop up. You can ignore it by hitting the Cancel button.

3. Creating a SSH Session
- In the top left corner of MobaXterm user interface, click on "Session" icon.

- Then click on the SSH icon in the top left of the new dialog, type
schooner.oscer.ou.eduin the "Remote host" text field, check "Specify username" and type your OSCER username in the text field next to it. Lastly, click "OK" button.

- The first time you connect to OSCER, you need to trust the connection by clicking the "Accept" button in the popup window.

- Enter the password of your OSCER account. Note that NOTHING WILL APPEAR AS YOU TYPE YOUR PASSWORD! This is a normal behavior of SSH.

- If you see
Access Deniedand MobaXterm prompts you to re-enter your password, it means either your password or your username is incorrect.

- If you forget your password, please go to:
https://account.oscer.ou.edu/
Enter your OSCER username and the email you used to register for your OSCER account. Then follow the on-screen instruction to reset your password.
- If you cannot reset your password using the link above (i.e. you forgot your OSCER username and/or the email you registered for your OSCER account), please contact OSCER support at:
support@oscer.ou.edu
- By default, if you type your OSCER password correctly, MobaXterm will ask whether you want it to remember the password for you so that next time when you open the same SSH session, you won't have to type your password again. As a security precaution, we do not recommend doing so.

- However, if you still insist MobaXterm saving passwords for you, you will need to set up a MobaXterm "master" password, which is a DIFFERENT password from your OSCER account's password.

- The image below is how MobaXterm looks like after you successfully logged in. The left panel is a mini file browser based on SFTP (Secure File Transfer Protocol) connection, showing the file and directory structure of your home directory right after you log in. The right side is your terminal, where you would type different commands to set up your work environment, compile your code, and/or run your favorite Linux software.

4. Closing a SSH Session
- When you finish working with OSCER, you can either close MobaXterm or just the current session "tab".

- MobaXterm will ask you to confirm you want to close the SSH session. Click "Yes" to confirm.

- MobaXterm automatically saved your SSH session configuration so that next time when you want to reconnect to OSCER, simply double-click on the saved SSH session on the left panel of MobaXterm.

(B) PuTTY
1. Downloading and Install PuTTY
- Point your browser to the PuTTY download page:
http://www.chiark.greenend.org.uk/~sgtatham/putty/download.html
- On the "PuTTY Download Page," in the section titled "Binaries," under "For Windows on Intel x86," right click on the first link putty.exe, and from the menu select "Save Link As" (or something similar).
- Save putty.exe to your Windows desktop. The icon will look like two little PCs and a yellow lightning bolt.
2. Running PuTTY to Log In to an OSCER Computer
- Double click on the PuTTY icon. This will pop up a window titled PuTTY Configuration
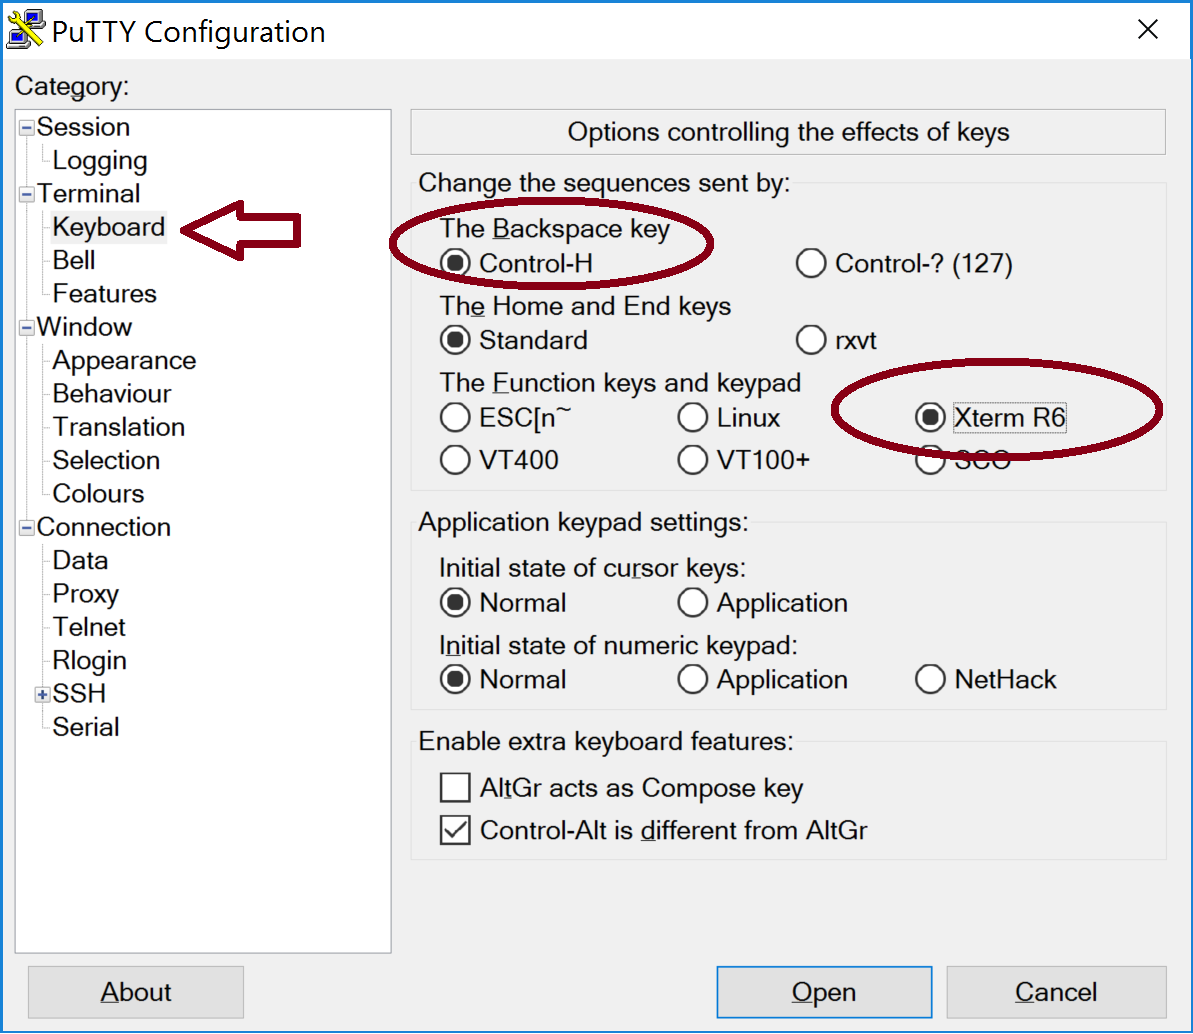
- On the left side of the PuTTY Configuration window, go to Terminal > Keyboard, and make the following changes:
- Under Change the sequences set by:, change the value of The Backspace key to Control-H
- UnderThe Function keys and keypad, select Xterm R6
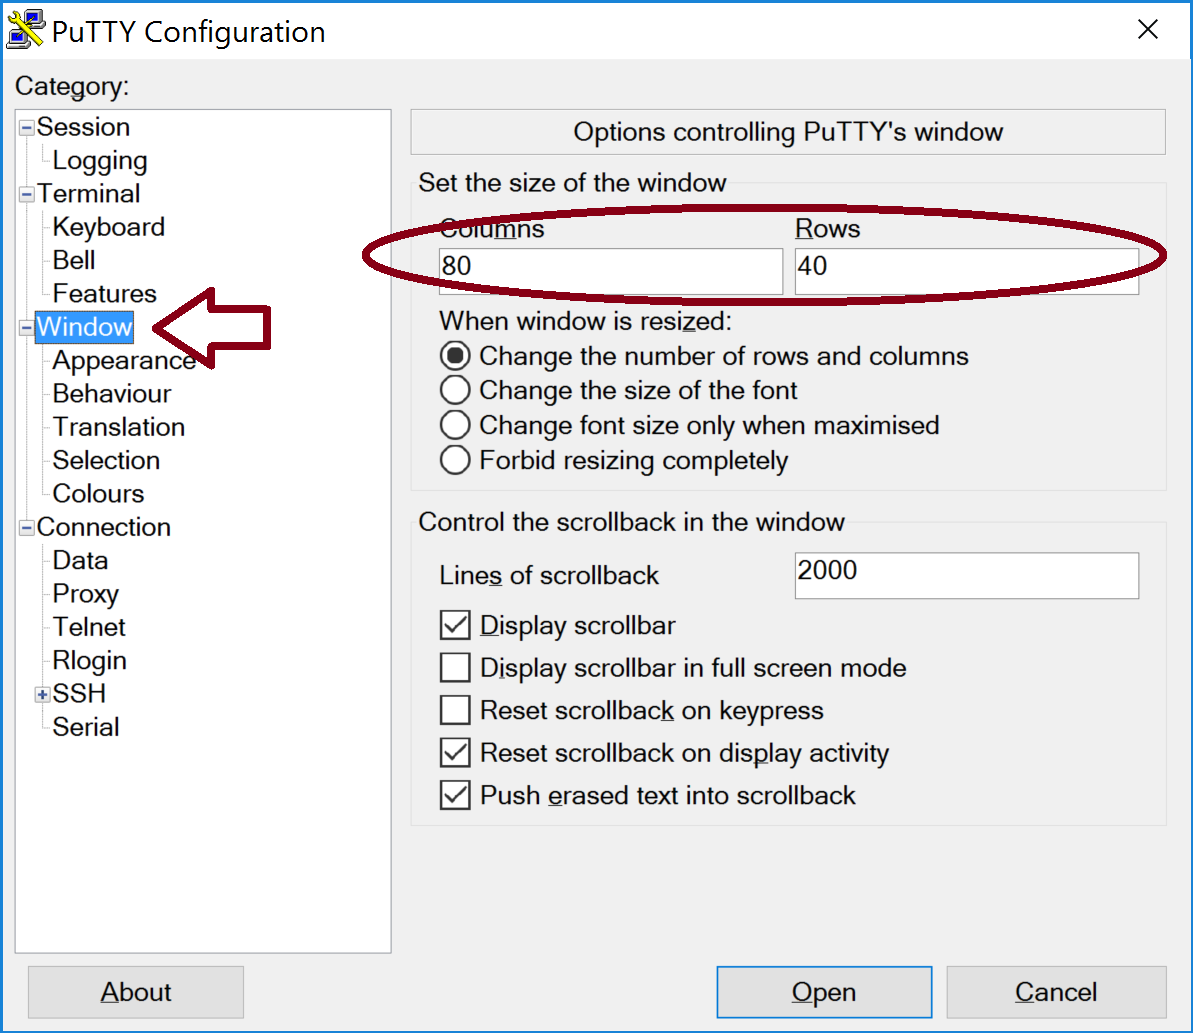
- On the left side of the PuTTY Configuration window, click on Window. This will bring up a section titled Options controlling PuTTY's window. The first option is Set the size of the window. You may choose as many rows as you like (40 is recommended), but you should be sure to choose EXACTLY 80 columns.
NEVER RESIZE THE PUTTY WINDOW USING THE MOUSE, AND NEVER CLICK THE MAXIMIZE BUTTON AT THE TOP RIGHT OF THE WINDOW.
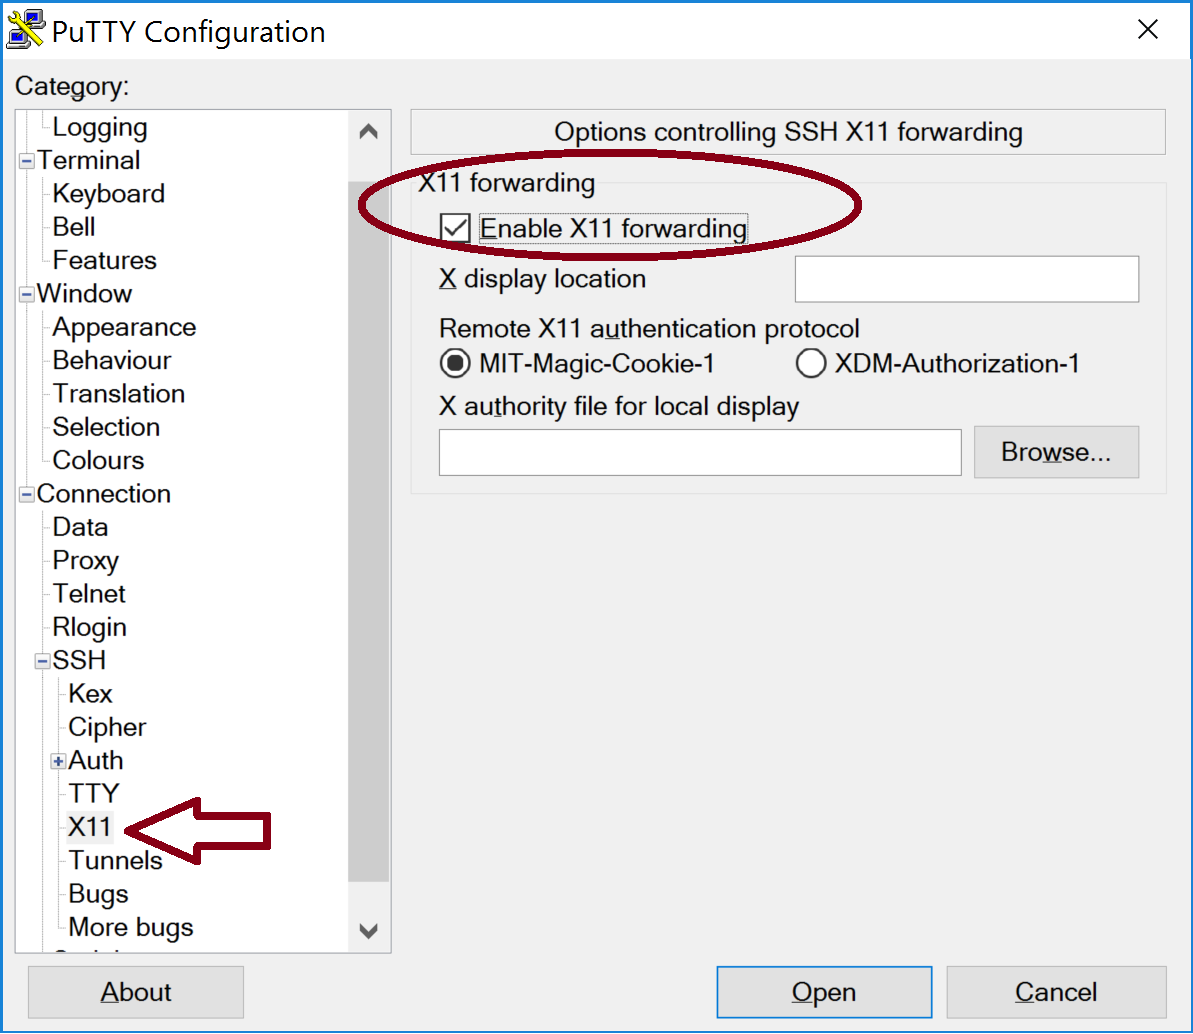
- On the left side of the PuTTY Configuration window, go to Connection -> SSH -> X11. Under the section titled Options controlling SSH X11 forwarding, select Enable X11 forwarding.
NOTE: X-Windows forwarding will work only if your Windows PC has some kind of X-Windows emulator (for example, Xming).
If you don't have an X-Windows emulator on your Windows PC, then you don't need to do this.
- On the left side of the PuTTY Configuration window, click on Session. This will bring up a section titled Basic options for your PuTTY session. The following entries can be made in this section:
- Under Host Name (or IP address), type the full name of the computer that you are logging into; for example: schooner.oscer.ou.edu (Click here for a list of all OSCER login nodes)
- Immediately below this is Connection type:. Select SSH
- If you want to save this login information, then under the section titled Load, save or delete a stored session, type the name of the computer that you are logging into; for example: schooner.oscer.ou.edu, and click on Save.

- Under Host Name (or IP address), type the full name of the computer that you are logging into; for example: schooner.oscer.ou.edu (Click here for a list of all OSCER login nodes)
- At the bottom right of the PuTTY Configuration window, click Open
- If a PuTTY Security Alert window pops up, click Yes
- When prompted to login as, type your username and press the Enter key.
- When prompted for your password, type your password and press the Enter key. NOTHING WILL APPEAR AS YOU TYPE YOUR PASSWORD. This is normal for Unix.
Mac OS X
Mac OS X comes with a built-in Unix Terminal window that can be used to SSH into OSCER systems. Follow the steps below to access OSCER systems using your Mac OS:
- Double click on your hard drive to open it.
- Double click on your Applications folder.
- Double click on your Utilies folder.
- Double click on Terminal.
- Once you get a Terminal window, you'll get a Unix prompt. At the Unix prompt, type:
ssh yourusername@machinename
(Replaceyourusernamewith your OSCER username.)
In the case of OSCER, yourmachinenameis:schooner.oscer.ou.edu
(Click here for a list of all OSCER login nodes)
- You may be asked a yes/no question, in which case type:
yes - You'll then be prompted for your password. Type your password and press the Enter key. NOTHING WILL APPEAR AS YOU TYPE YOUR PASSWORD. This is normal for MacOS and Linux.
Unix (including Linux)
Most Unix computers already have ssh installed, so you can just use it from the Unix command line, as described above for Mac OS X, starting from Step 5.
